How to build an ethereum mining rig
1. What is Ethereum Mining?
Mining is the process of creating transaction blocks that will be added to the Ethereum blockchain. Ethereum, like Bitcoin, currently uses a PoW consensus mechanism. Mining is the lifeblood of proof of work. Ethereum miners-computers with software-use their time and computing power to process transactions and create blocks.
1.1. Block Rewards and Mining Fees
Bitcoin block rewards are new Bitcoins awarded to cryptocurrency miners because they are the first to solve difficult mathematical problems and create new verified Bitcoin transaction blocks. To this end, miners use a computer network, and every time a new block is created, all other competing miners will verify it. Then a new mathematical problem was introduced, and the miner started again.

Block rewards are an incentive for Bitcoin miners to process transactions using cryptocurrencies. Immutable recording of these transactions is essential to the proper functioning of Bitcoin. Blockchain is like a decentralized bank ledger, once created, it cannot be changed. Miners are required to verify transactions and keep this ledger up to date. For this, they pay block rewards and, to a lesser extent, transaction fees.
To ensure that transactions are conducted on the cryptocurrency network, outbound transactions to external cryptocurrency addresses usually require “mining” or “network” fees. The commission is paid to cryptocurrency miners, who are the systems that process transactions and protect the related network. Coinbase takes over and pays these fees directly. Therefore, Coinbase will charge fees based on estimates of the network transaction fees we expect to pay for each transaction. In some cases, the fees paid by Coinbase may differ from this estimate. All fees we charge will be disclosed when you trade. Coinbase does not charge network fees for the transfer of cryptocurrency from one Coinbase wallet to another.
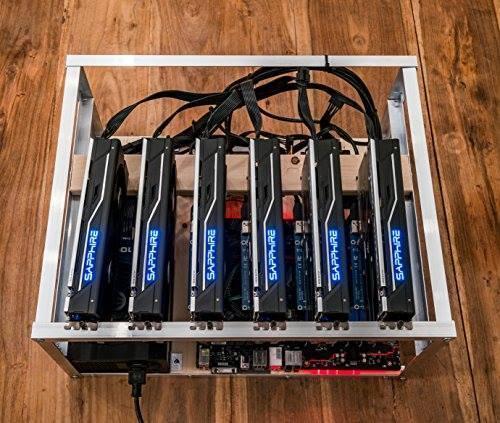
2. What is an Ethereum Mining Rig?
You can mine Ethereum on ordinary gaming computers. However, to make it as efficient as possible, you can build a unit whose sole purpose is to mine Ethereum. It takes a while, and it’s not cheap. This really means that you are much more efficient at mining Ethereum compared to just using a standard computer system.
Ethereum mining equipment (the name of these special equipment) is an all-in-one computer system designed and constructed for mining Ethereum (or other cryptocurrencies).
3. What You Will Need to Build an Ethereum Mining Rig
3.1. Ethereum Mining Hardware
1. AMD RX 580
AMD RX 580 is one of the most energy-efficient graphics cards on the market and is a great choice to start building Ethereum mining equipment. Whether in terms of cost or power consumption, it is one of the most affordable GPUs you can find for Ethereum mining. You can usually buy AMD RX 580 for around $300, depending on whether you are buying a brand new or used one. In addition, the power consumption of the card is lower than most competitors, as are comparable NVIDIA cards.
2. GeForce RTX 3060 Ti
The Ti version of the GeForce RTX 3060 is as powerful as the base version 3070, and if you can afford it, it is a smart choice for Ethereum mining equipment. The power consumption of this GPU is slightly less than 120W, but it can provide you with 60 MH/s, which means a lot for the price. Of course, you will want to optimize the map a bit to keep the temperature lower, but once it’s done, you’re done!
3. NVIDIA Titan V
As you may know, NVIDIA Titan V is the titanium metal of the graphics card. This is one of the best NVIDIA cards, and if you can afford it, it is very suitable for Ethereum mining. Titan V consumes about 250 watts of power, but therefore generates up to 70 MH/s. If you want to earn a reasonable income while mining Ethereum, this card may be worth the demanding commission.
4. NVIDIA GTX 1060
Compared to most other cards on this list, the NVIDIA GTX 1060 is quite cheap, making it one of the more affordable options for Ethereum miners. However, you need to obtain the 6GB version of this card instead of the 3GB version. Otherwise, it will not be enough to mine Ethereum effectively.
5.AMD Radeon RX 5700 XT
If you are willing to spend more than a thousand dollars on a sufficiently powerful graphics card, then AMD Radeon RX 5700 XT is for you. This is a good choice for newbies who have just started mining but have money to burn. On average, it provides a hash rate of about 55 MH/s while consuming 225 watts of power.
6.Radeon RX 570
If you want to start mining on a tight budget, Radeon RX 570 is a good choice, about $70 lower than the price of its 580 similar products. It is important to note that if you know what you are doing, you can get almost the same performance as the 580. Thanks to overclocking and other methods, you can get 570 with a working power of about 70 watts and a hash rate of 30 MH/s.
7. Radeon R9 HD 7990
We ended up with a powerful mid-range AMD card. The R9 HD 7990 achieves a hash rate of approximately 36 MH/s while consuming 375 watts of power. This may sound powerful, and it is, but considering that you can get such a fast hash rate with a cheap card, it’s well worth it.
3.2. Ethereum Mining Software
1. NBMiner
NBMiner is currently the most popular Ethereum miner, if you have an NVIDIA LHR graphics card, it is the best choice. These video cards halve the hash rate, so miners will not hoard them. However, NBMiner recently released an update that can unlock up to 70% of the mining performance on these Lite Hash Rate GPUs. This update will not immediately improve performance, but it allows you to use LHR mode and increase the received hash rate.
2. T-Rex Miner
Next on the list is one of the fastest Ethereum miners you can install on NVIDIA-based systems. If you have some of the best graphics cards and value each hash rate, T-Rex Miner will let you get the last ounce of mining power from the GPU. The rejection rate of iT is also very low, less than 1% in most cases.
3. PhoenixMiner
PhoenixMiner is also one of the fastest mining programs, but we have to put it under T-Rex because of its slightly higher rejection rate. In some cases, depending on the card, you can get a faster hash rate of about 1-2 MH/s compared to T-Rex, but a bounce rate of about 2% or higher may make many users feel depressed.
4. TeamRedMiner
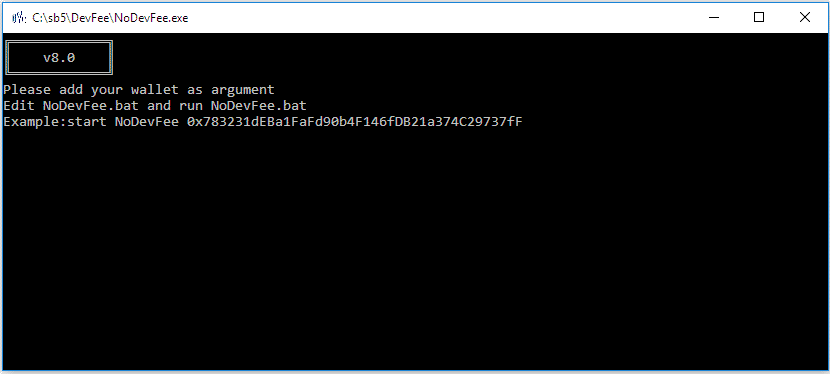
This miner is only suitable for AMD graphics cards. Therefore, if you are a fan of Team Red, then this is one of the best miners you can install on your system to mine Ethereum. The cost of Ethash algorithm development depends on the GPU you have. For Polaris GPU, it is set to 0.75%, and for the remaining cards, it is set to 1%.
5. GMiner
If there is one miner on this list that can rival Phoenix miners in terms of cost, it is GMiner. You only need to pay 0.65% of developer fees to mine Ethereum, which is one of the lowest fees among all popular mining software. It is suitable for NVIDIA and AMD GPUs, and is very suitable for mining equipment with hybrid GPUs.
6. LolMiner
At the bottom is LolMiner, a program built for AMD GPUs. However, the good news is that most NVIDIA graphics cards are also compatible, but mining speed and stability will depend on the specific GPU model.
4. How to Build Your Mining Rig
4.1. Building the Computer Itself
Step 1: Install the power supply.
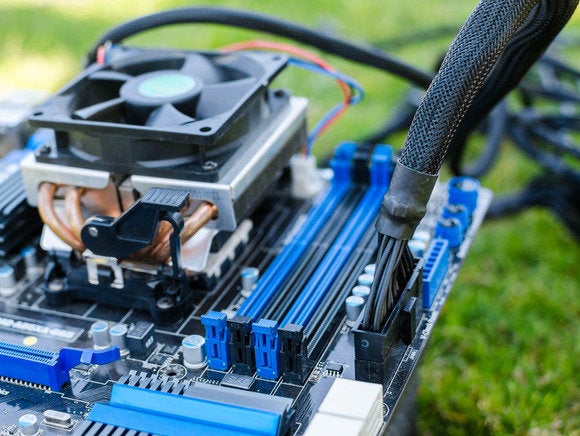
Step 2: Install the processor.
Step 3: Install the RAM.
Step 4: Install the motherboard.
Step 5: Install the CPU cooler.
Step 6: Install the graphics card.
Step 7: Install any expansion cards.
Step 8: Install your storage drives.
4.2. Adding the Power Supply Unit
You can use these two tools to understand how much wattage your new power supply will need to deliver and which features you’ll want—unless you’re upgrading to a new, more powerful graphics card that demands a new, more powerful PSU. Keep in mind that there’s nothing wrong with buying a power supply that provides more power than you actually need, especially if there’s the possibility of further PC component upgrades in your future.
If you purchased a modular power supply with removable cables, figure out which ones you’ll need to deliver energy to your components and plug them into your power supply before you get started—it’s much easier to do before the PSU is embedded in your computer.
4.3. Adding the GPUs
1) Power down the PC.
2) Hit the switch on the back of the PC to turn off supply to the PSU.
3) Extract the side panel (usually held on by two screws on the rear). …
4) Remove the screws holding the GPU in on the rear bracket. …
5) Unlock the PCI-e slot clip.
6) Remove the GPU by lightly pulling on the card.
4.4. Taking Care of the Software
- Install Antivirus Software.
- Perform Regular Software Updates.
- Run Computer Maintenance.
- Backup Files.
- Keep Your Keyboard Crumb Free.
- Clean the Screen.
- Remove Dust from Vents and Fans.
- Use a Surge Protector.

5. Powering Up Your GPU Mining Rig
5.1. Making it all Look Good!
Necessary characteristic:
- Total 12 graphics cards
- AMD graphics cards support a maximum of 12 cards.(driver 17.11.1 version later)
- NVIDIA graphics cards only support a maximum of 8 cards due to driver limitation.
- Memory: 16GB
- Power supply: 1200W x2 (depend on the power consumption of graphics cards)
5.2. Use Coloured Aluminium Lengths
Structurally they can be solid and dense or crumbly. The usual colour is brick red, flaming red or brown because of iron oxide. If iron content is low, bauxite can be grey or white. But yellow, dark green and even multi-coloured bauxites with bluish, purple, red and black strains occur too.
5.3. Close the Mining Rig Frame and Decorate it
The Akyga AKM091 case introduced a new rack design method for cryptocurrency miners. It is an ideal solution to combat the high temperatures generated when the equipment is operating at maximum speed. The enclosed enclosure wall makes the airflow more targeted than standard encryption miner installations. This makes the cooling of the components more efficient, thereby reducing the risk of damage to the graphics card due to overheating and improving their performance. Therefore, this is not only an ideal solution for mining, but also an ideal solution for creating small servers.
The steel structure and sturdy riveted wall fixation make the cabinet highly rigid and reliable. The top cover is fixed with screws, and the installation components can be removed. Below it, you can find an adapter board and an installation outline for 6-9 graphics cards, depending on their size. In addition, there are protruding pins at the bottom for easy installation of the motherboard. There is space for two ATX power supplies next to it. The mounting holes allow you to easily connect the power supply to the chassis using screws. In addition, there is room for installing two chassis fans at the front and rear. Therefore, up to 10 120mm fans can be installed to effectively circulate the air in the case. In addition, there is a built-in on/off switch and four USB ports on the front panel. Two standard USB 2.0 ports and two high-speed USB 3.0 ports.
5.4. Experiment with Different Ways to Hang Your GPUs
The standard installation method of the GPU is horizontal installation, with the GPU facing down towards the bottom of the chassis. This is not the most beautiful appearance, but it works and has been tested.
This is an important aspect for your PC when installing the GPU vertically. As long as you have a clear side panel, you can fully display your graphics card. This is because the front of the graphics card faces outwards, not downwards.
If you have an RGB backlit graphics card, you want to show it. This is when the vertical GPU mounting option comes in handy.
The vertical GPU installation looks great. This is because it allows you to see your graphics card cooler, which is usually one of the most well-known kit components on a PC. It is worth mentioning that many graphics cards today are also backlit. This is why people often walk upright.
Please note that in some cases, choosing a vertical GPU installation may cause problems. Either it is too close to the side panel, or it can cause airflow problems on the graphics card.
In any case, vertically stacked GPUs are an excellent choice for building custom liquid-cooled PCs.
5.5. Add a Monitor to the Unit
- Find the monitor’s connector cable. It should be included with your purchase.
- Match the cable with one of the video ports on the back of the monitor. The images below show each of the video ports used today (with the general exception of S-Video).
- Plug the cable into the corresponding ports on both your monitor and computer.
- If not already done, plug the flat end of the monitor power cord (left cable end shown below) into the back of the monitor. The power cord may also be built into the back of the monitor.
- Plug the other end of the monitor power cord (shown on the right in the above picture) into a power outlet.
- Turn on the computer and turn on the monitor. The power button for the button is often found on the front or bottom of the monitor on the right side.
6. Conclusion
FAQ
How long does it take to mine 1 ETH?
The time required to mine 1 ETH depends entirely on your computing power and the current difficulty of the Ethereum network. It is impossible to say exactly how long it will take, but on average, it is estimated that with a computing power of 100 MH/s, it may take about 6 months to mine 1 ETH.
What is the best Ethereum equipment?
The best setting for mining Ethereum depends entirely on your budget and needs. If you can find a card that is reasonably priced, has good computing power, and does not consume too much power, this is the best way. Of course, this solution depends on your specific requirements.
Can my rig mine Ethereum?
Chances are that your rig can mine Ethereum, but if you don’t try it yourself, it’s hard to see how efficient it is. Of course, you can look at your GPU online to see the average level of other miners; or you can download your mining software and see what happens.